A Bit About Rock Tumbling
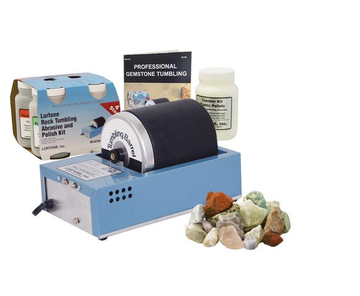
Using a rock tumbler to polish your special finds and treasures is a great hobby and a great way to bring out the natural beauty of the stones. It really is quite easy and it is one of those things that you learn as you go.
Most people who have polished rocks this way – even driveway gravel – have not just turned a regular stone into something beautiful but they have also created memories. My best friend certainly recalls the keychain made from a stone tumbled in her Grade 6 class -- Using stones found on the playground (she may even still have it).
WHAT YOU NEED TO GET STARTED
A Rock Tumbler (kinda obvious I know); 4 Step Tumbling Compound/Grit; 1 lb of Rough (raw stones) of relatively the same hardness; water & time. Most people use plastic pellets in the last couple stages. These act as filler to bring the lode back up to the optimal level (1/3 to ¾ full). Plastic pellets are re-usable.
It is important to get the rock tumbler that has a rubber barrel – such as those sold by Lortone. The stones hang on the outside of the barrel and are brought up high enough to tumble back down on the others – replicating wave action with sand and water between the stones. The stones need to fall down on each other to polish effectively. Not to mention that the rubber barrel is quieter than a plastic one.
It is very important to tumble stones that are of relatively the same hardness – this is where you will need to know a bit about mineral identification – well, the part about mineral hardness at least. The harder stones will wear away the softer ones and you will lose some material.
HOW TO TUMBLE ROCKS
Fill barrel with rocks – A 3 lb. Tumbler barrel holds approximately 1 lb. of material.
Add tumbling compound – (stages 1 & 2 are silicone carbide and stages 3 & 4 are aluminum oxide); add enough water to cover the stones – about 2/3 to ¾ full is optimal. Close it up and tumble – checking every couple of days.
There are 4 stages of tumbling compound and each stage takes between 4 and 10 days – depending on the hardness of the stones.
Perhaps the most important thing to do to be successful in polishing stones is to meticulously clean the stones and the barrel between stages. If just one grain of tumbling compound is transferred from one stage to the next, it will keep putting grooves in the stones. Scrub the stones with a brush to get all particles off the stones and particularly out of any grooves.
Lortone Rock Tumblers are designed to run 24/7 for years with proper minimum care.
RESOURCES
Lortone online – Lortone do a great job of providing all of the basic information required to get started with your Rock Tumbler. You will find a short video on how to load the barrel (2.5 min.) as well as one on how to change the belt on the 3A Rock Tumbler (4 min.). A fantastic resource and perhaps all that you need.
www.lortone.com
A proud authorized dealer for Lortone Canada, Lakeside Gems has been selling Lortone rock tumblers and supplies for going on 25 years. Lortone Rock Tumblers are the best on the market, North American-made (now by Covington Engineering, U.S.A.) by a second generation family owned business.
We hope that you find this information helpful.
Previous article